Monday, February 23, 2009

BROCHURE dan BOOKLET.....continue


Microsoft Word can automatically create a booklet from an existing or blank document. When you choose the booklet setting, Word will automatically change the properties of the document so you can print a professional looking booklet. So, lets try...


1. Open Microsoft Word and start a new blank document.

2. Choose the "File" menu and select "Page Setup" to open the "Page Setup" dialog box. If the "Margins" tab is not already selected, click on the "Margins" tab.


3. Select "Book fold" from the "Multiple pages" drop-down menu. This will automatically change the margins of "Left" and "Right" to "Inside" and "Outside," bring your Gutter to 0 and change your page orientation to Landscape.


4. Enter new measurements for the "Inside" and "Outside" margins. The margin for "Inside" will be the space between your text and the edge of the page on the inside of the booklet, and the margin for "Outside" will be the space between the edge of your page and text on the outside page.

5. Increase the amount of Gutter in the "Gutter" box if you need to allow more space for binding of your booklet.

6. Choose the number of pages you want to include in your booklet in the "Sheets per booklet" list. If you wish to have more than 16 pages in your booklet, Word can print the document as multiple booklets.

7. Make any other changes in the "Page Setup" dialog box and click the "OK" button to change your document to a booklet.

Selamat mencuba..

BROCHURE dan BOOKLET.....

Hari ini dah masuk minggu keenam. Saya nak berkongsi dengan anda semua apa yang telah saya pelajari pada minggu lepas. kami telah mempelajari bagaimana menghasilkan BOOKLET dan BROCHURE dengan menggunakan Microsoft Word. Barula saya tahu rupa-rupanya tak susah pun nak menghasilkan booklet dan brochure.


BROCHURE

1. Hasilkan ‘page’ yang dikehendaki

- Klik File

- Klik ‘Page set up’

- Klik ‘paper size tab’ dan tukar orientasi kepada landskap

- Kemudian klik ‘margins tab’ dan pilih margin yang sesuai


2. Kolum

- kemudian anda boleh memilih bilangan kolum yang sesuai untuk brochure anda.

- Klik Format, kemudian pilih ‘columns’

- Klik ikon tiga kolum di bahagian ‘Presets’

- Kemudian klik ‘OK’


Ini adalah cohtoh Brochure yang telah saya buat dengan menggunakan Microsoft Word. Sekarang anda bolehla mencuba mengikut kreativiti masing-masing...


Setakat ini sahaja saya jelaskan bagaimana menghasilkan Brochure..Untuk post yang akan datang saya akan jelaskan cara-cara menghasilkan Booklet...


Monday, February 16, 2009

PENGIRAAN MARKAH: Peperiksaan Dan Gred

Baru-baru ini, kami telah diberi tugasan oleh Puan Sakinah untuk membuat pengiraan markah peperiksaan dengan menggunakan Microsoft Excel. Di bawah adalah cara-cara pengiraan markah dan gred dilakukan dengan menggunakan Microsoft Excel....


Selamat Mencuba.....

Sunday, February 15, 2009

VLOOKUP function - Microsoft Excel


  • If you know the employee's ID number, you can use the VLOOKUP function to return either the department or the name of that employee.
  • To obtain the name of employee number 38, you can use the formula =VLOOKUP(38, A2:C10, 3, FALSE). T
  • his formula searches for the value 38 in the first column of the range A2:C10, and then returns the value that is contained in the third column of the range and on the same row as the lookup value ("Axel Delgado").
  • The V in VLOOKUP stands for vertical. Use VLOOKUP instead of HLOOKUP when your comparison values are located in a column to the left of the data that you want to find.

Microsoft Excel: Operasi Campur

Microsoft Excel merupakan sejenis perisian aplikasi helaian elektronik yang digunakan untuk membantumenguruskan pengurusan data-data yang melibatkan pengiraan khususnya data-data kewangan.Penggunaannya dapat menjamin ketepatan dalam pengiraan selain kepantasan dalam menyelesaikanmasalah penyimpanan data, pengiraan, analisis data serta melukis graf.


Operasi Campur


Terdapat beberapa cara untuk melaksanakan operasi ini. Antaranya:

Cara Pertama
  • Klik pada 'Name Box' untuk mendapatkan senarai operasi yang anda perlukan.
  • Anda akan dipaparkan dengan senarai berikut:
  • Klik pada salah satu operasi yang anda kehendaki. Contohnya:SUM(untuk operasi pengiraa campur).
  • Anda akan dipaparkan dengan kotak dialog ‘Sum’.

  • Anda akan dapati pada ‘Formula bar’ memaparkan satu formula pengiraan untuk operasi campur.
Contoh: =+SUM(E2:E11)
  • Klik atau tekan kekunci dan anda akan dapati ruangan jumlah telah pun berisidengan jawapan yang sama terdapat pada ‘Formula result’ di kotak dialog. Contohnya adalah seperti berikut:
  • Sekiranya anda ingin mencari jumlah menggunakan operasi yang sama pada ‘sejumlah angka’ berikutnya, anda boleh menggunakan arahan sebagaimana berikut:


Cara Kedua


Selepas menaipkan tanda +, anda perlulah:

  • Klik pada setiap satu sel yang mengandungi angka dan taipkan tanda +.
Contoh: +E2+E3+E4+E5+E6+E7+E8
  • Tekan kekunci dan jawapan akan dipaparkan pada sel E9.


Cara Ketiga

  • Taipkan formula pengiraan di dalam ‘Formula bar’:+SUM(E2:E11).
  • Tekan kekunci dan jawapan akan dipaparkan pada sel E12.

Selamat Mencuba
...

Thursday, February 12, 2009

How to Put a Hyperlink in Microsoft PowerPoint

1. Hyperlink 0ptions in Power Point Presentation.

2. Use the Hyperlink Button in Power Point.
3. Add a Hyperlink to a specific slide in this presentation.

4. Hyperlink to a slide in a different Power Point Presentation.
5. Hyperlink to another file on your computer or network.
Ini adalah langkah-langkah untuk membuat hyperlink...kepada sesiapa yang masih belum berjaya membuat hyperlink, diharap post ini dapat membantu anda...Good Luck..

Wednesday, February 11, 2009

4Tip Mudah Untuk Menghasilkan Power Point.....

Setelah saya fikirkan apakah soft skills yang boleh saya kongsikan bersama anda disini, saya terfikir tentang kemahiran menggunakan perisian Microsoft PowerPoint yang baru saja saya pelajari dalam kelas tutorial inovasi dan teknologi. Perisian ini adalah amat penting jika anda mahu membuat sebarang presentation tidak kira anda masih belajar atau anda sudah bekerja. Di dalam era informasi ini, anda akan jauh ketinggalan jika anda tidak tahu menggunakan perisian ini untuk membantu presentation anda.

Tip #1: Master Slide

Setiap kali anda ingin gunakan perisian PowerPoint, anda perlu pilih background yang anda inginkan. Background atau latar belakang slide anda mestilah sesuai supaya perkataan yang anda paparkan kelihatan jelas dan menarik.Selama ini, mungkin anda hanya gunakan ‘design templates’ sebagai latar belakang slide anda. Lihat menu utama perisian PowerPoint anda. Design template anda boleh perolehi dengan klik 'slide show’ –> klik ‘animation scheme’. Anda boleh lihat rekaan-rekaan latar belakang yang anda boleh gunakan. Cuma klik pada mana-mana rekaan yang anda mahu gunakan. (imej dibawah menunjukkan beberapa rekaan yang sedia ada di dalam PowerPoint)

Namun, jika anda ingin lebih maju dan kelihatan lebih professional, saya cadangkan agar anda mencipta latar belakang anda sendiri. Ini adalah kerana:
  • Anda boleh cipta latar belakang yang lebih relevan atau sesuai dengan apa yang anda persembahkan. Contohnya jika anda sedang membuat presentation tentang perniagaan beras, anda boleh gunakan gambar beras sebagai latar belakang.
  • Anda boleh jadi lebih kreatif. Jika anda jadi lebih kreatif, presentation anda akan jadi lebih menarik. Anda juga akan rasa seronok dan tidak sabar untuk membuat presentation anda.

Apabila anda membuat design latar belakang di master slide, setiap kali anda klik untuk keluarkan slide baru, design yang anda gunakan di master slide ini akan keluar. Jadi, anda perlu fikirkan latar belakang yang sesuai untuk presentation anda. Ada beberapa tips untuk rekaan atau design untuk master slide anda.

  • Gunakan warna yang menyerlahkan tulisan anda. Anda boleh gunakan kombinasi warna terang seperti merah atau biru dengan warna yang lembut seperti warna kuning atau biru muda. Anda lihat dan cuba sendiri kombinasi warna manakah yang sesuai untuk anda.
  • Jika anda mahu gunakan gambar, pastikan gambar itu tidak terlalu terang hingga menggangu penonton melihat tulisan anda.
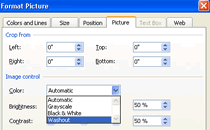
  • Jika anda mahu gunakan gambar dan anda tidak tahu cara menggunakan perisian lain untuk mengolah gambar tersebut, anda boleh insert gambar tersebut dahulu ke slide, dan ‘right klik’ –> Klik format picture –> Colour –> Washout. Kemudian anda boleh olahberapa terang gambar itu dengan mengawal ‘brightness’.


Tip #2: Gambar, Bunyi atau Muzik

Kita mulakan dengan bagaimana memasukkan imej dahulu. Mudah sahaja. Pada panel utama anda, klik insert –> Picture –> From file. Kemudian buka folder di mana anda menyimpan gambar yang hendak anda masukkan itu. Klik pada gambar itu dan klik ok. Anda juga boleh masukkan imej berbentuk ‘animation’. Setelah anda masukkan imej yang berbentuk animation, ia akan bergerak apabila anda memulakan ’slide show’.
Bunyi atau muzik
  • Mula-mula, klik insert –> Movies and Sound –> Sound from file. Kemudian muzik atau file bunyi mana yang anda ingin masukkan. Satu tip untuk anda, anda patut save file muzik ini ke dalam folder yang sama dengan file powerpoint anda. Ini akan memudahkan anda terutamanya jika anda terpaksa memindahkan file powerpoint ini ke komputer lain.
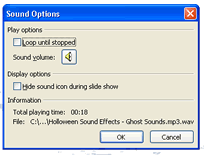
  • Setelah anda insert muzik seperti langkah diatas, anda akan ditanya, “How do you want the sound to start in the slide show? [Automatically] [When Clicked]”.Jika anda klik ‘automatically’, bunyi itu akan terpasang dengan sendiri apabila anda membuka slide tersebut. Jika anda klik ‘when clicked’, bunyi itu akan terpasang apabila anda klik pada icon speaker yang keluar pada slide itu.Kalau bunyi muzik anda itu pendek dan anda mahu ia berbunyi berulang-ulang kali, anda boleh ‘right click’ pada ikon speaker, dan klik ‘edit sound object’. Kemudian klik pada ‘loop until stopped’. Ini bermaksud, bunyi atau muzik anda akan sentiasa berbunyi berulang-ulang kali hingga anda menukar slide atau menghentikannya dengan sengaja.
Tip #3: Slide Transition

Slide transition ialah bagaimana cara anda mahu anda slide anda bertukar dari satu slide ke slide yang lain. Contohnya, dari slide satu ke slide 2, anda mungkin mahu slide 1 pudar sedikit demi sedikit dan terus hilang, kemudian slide kedua terus muncul. Anda boleh pilih jenis slide transition yang anda mahu dengan klik slide show –> Slide transition. Anda akan lihat jenis-jenis slide transition di sebelah kanan power point anda seperti imej di bawah.

Anda perlu mencuba jenis transition mana yang anda perlukan. Lihat pada ‘modify transition’, ada dua perkara yang anda perlu pelajari di sini. Pertama, ’speed’. Ini adalah berapa laju anda mahu slide anda bertukar. Jika anda pilih slide transition ‘box in’, dan anda klik speed fast, slide anda akan bertukar dengan sangat laju. Jadi, anda boleh pilih kelajuan yang sesuai untuk presentation anda.


Tip #4: Custom Animation

Custom animation ialah fungsi-fungsi yang anda boleh gunakan untuk mempelbagaikan cara mempersembahkan isi kandungan presentation anda. Dengan menggunakan custom animation, anda boleh mengeluarkan isi kandungan presentation anda satu persatu dan dengan pelbagai cara. Caranya, klik Slide Show –> Custom Animation. Kemudian, anda akan lihat beberapa ikon custom animation di sebelah kanan power point anda.


Anda dapat lihat ikon ‘Add effect’ dalam imej di bawah. Add effect ini cuma akan aktif jika anda klik sesuatu yang hendak anda animasikan di dalam slide anda.
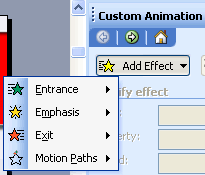

Contohnya, jika anda klik pada mana-mana kotak tulisan dalam slide anda, ikon add effect ini akan kelihatan aktif (ada warna, tidak berwarna kelabu pudar). Apabila anda lihat ikon ini aktif, cuba klik pada ikon tersebut. Anda akan lihat 4 jenis custom animation yang anda boleh gunakan iaitu Entrance, Emphasis, Exit dan Motion Path. hari ini, saya akan terangkan fungsi keempat-empat perkara ini satu persatu.


Entrance - Apabila anda gunakan effect entrance pada tulisan, tulisan itu tidak akan muncul semasa slide show. Tetapi setelah anda klik mouse anda atau klik down arrow button, tulisan itu akan keluar. Jadi, gunakan effect ini untuk mengeluarkan isi presentation anda satu persatu.


Emphasis - Ini digunakan untuk menguatkan presentation anda untuk sesuatu isi. Contohnya anda sudah keluarkan tiga isi penting. Kemudian, anda mahu menekankan kepentingan isi ketiga. Jadi, anda gunakan Emphasis untuk membesarkan tulisan itu, menukar warnanya atau apa saja jenis emphasis yang anda suka.


Exit - Katakan anda sudah senaraikan 10 isi penting di dalam slide anda. Kemudian anda mahu terangkan tentang isi yang ke sepuluh. Jadi, anda boleh gunakan Exit ini untuk mengeluarkan 9 lagi isi tadi. Kesannya, isi itu akan hilang dengan cara yang anda mahukan.


Motion Path - Anda boleh gunakan ini untuk membuat sedikit animasi di dalam presentation anda. Contohnya, anda ada gambar orang sedang berjalan. Gambar itu tidak bergerak. Tetapi anda boleh gunakan motion path ini dengan membuat gambar itu bergerak ke mana-mana sahaja yang anda mahu.


Selamat mencuba.


Tuesday, February 10, 2009

PowerPoint Basics

If you can use a word processor like Microsoft Word you already possess most of the knowledge and skills you need to create a PowerPoint presentation. PowerPoint presentations are like slide shows with the ability to do some animation, play sound files, and even movie files. Besides its most common use, that is to hopefully maintain the attention of bored people at meetings, PowerPoint can be used to portray anything that lends itself to sequential presentation like telling stories, conducting show and tell, stepping through a task, role playing, etc…

Build a Slide Show from template

Open PowerPoint either from the Start Menu or from a shortcut if it is available. The PowerPoint window will open and smaller window will also appear with the following options:

    1. Create a new presentation using a Wizard - this is the easiest way to make a presentation but I am not going to cover it.
    2. Create a new presentation using a Template - which is the choice we will start with.
    3. Create a blank presentation - which we will look at later.
    4. Open an existing presentation.

Choose the template option. A new window will open offering a sample of prepared slides with some decorations and font choices ready to use. Use your arrow keys to scroll through the templates and choose one you like.

Choosing a Layout

Next, a window opens asking what kind of layout you want. As you can see there are many layouts to choose from including ones with pictures, charts, tables and more. We will choose the very first layout called "Title Page". Don't feel inhibited by the lack of a layout that suits your sense of design. You can pick one that is close and modify it, add to it, or subtract from it. Or, you can start from scratch.

Add Text

You are now in what I will call the editor. This screen lets you create and modify your slide show. With the title slide you just created, follow the prompts built right into the slide. Add a title and/or a subtitle as you see fit. You can alter the text, the font, its size and color. From the menu bar click Format and then click Font.

You can delete the subtitle text box if you want by clicking inside the subtitle text box. Next, carefully click on the border that surrounds the text box. The vertical text insertion cursor should disappear but the border should remain. Press the Delete key and the box should go away.

To add a text box, from the menu bar click Insert, then click Text Box. The mouse cursor turns into crosshairs that you use to create a new text box. Position the crosshairs where you imagine the upper left corner of your text box will start. Use the left mouse button in a drag operation and drag the crosshairs to where you want the lower right corner to be. As you drag you will see the outline of you text box form. Don't worry if it does not seem tall enough. It will grow as you enter text.

Use the justification, indent, list bulleting and other tools just as you would in Word.

Add a New Slide

To add a new Slide, from the menu bar click Insert and then click New Slide. The layout choices will again appear. This time pick the next kind of slide called "Bulleted List". Add some text to the slide including at least two items in the bulleted list part. Let's view our show so far. From the menu bar click Slide Show, then click View Show. Click your mouse to advance the slide show. After the last slide you will wind up back into the editor. Not terribly exciting, but it is a successful start. From the menu bar click File and Save, and give your show a name.

Add Some Special Animation Features

Make sure the slide editor is oriented to the second, bulleted list slide. Use the scroll bar on the right side to get there if you need to. For greater interest, you can add some animation to the bulleted list by clicking in the bulleted list so the list border shows. Then from the menu bar, click Slide Show and move the mouse cursor over Preset Animations. A menu appears. Select one of the items other than Off. View your show again. Try some of the other preset animations.

Import a Picture

Add a new slide. Choose a layout you like that does not have a chart or table, or choose the blank layout. To add a picture to the slide, from the menu bar click Insert, and then move the mouse over Picture, then click from File. A window will open allowing you to navigate to a desired picture file. Find one and insert it. You can resize and reposition the image. Click inside the picture to reveal the "handles". Use the handles to resize the picture. Point into the picture to drag it where you want it. You can also add pictures from the clipboard as well. BoardMaker lets you do this. Instead of copying the BoardMaker art to a board select the Copy button in the BoardMaker search screen. Switch back to PowerPoint and choose Paste from the Edit menu.

Insert a second picture. Now add a preset animation effect to one picture. Right click on the other picture and choose Custom Animation from the menu that appears. Make sure the Setting tab is on top. Select an action setting and a sound effect. Use the preview button to view the results.

View the slide show. Note that the order of the animation effects is in the order that the animations were assigned to the pictures. Later, we will see how to change the order of effects.

Add some "AutoShapes"

AutoShapes are special objects that you can "draw" by using a mouse drag operation. AutoShapes come in a wide variety of predefined shapes like arrows, ovals, rectangles, stars, speech balloons, etc.

To add an AutoShape look at the lower left side of the PowerPoint screen. Some AutoShapes are available on the lower toolbar like lines, arrows, rectangles, ovals, etc. Other AutoShapes are available by clicking on the "AutoShapes" menu on the same toolbar. Select a block arrow and create it on your slide by dragging over the area where you want it to appear.

You can resize and reposition an AutoShape just like text boxes and pictures. To alter the AutoShape appearance right click on the AutoShape, then click Format AutoShape on the menu that opens. You can change the fill color, the border color and thickness from the Colors and Lines tab. Try it.

You can also add text to your AutoShape. Right click the AutoShape and select Add Text from the menu that appears. You can start typing in some text. To alter the text appearance choose Format then Font from the menu bar. Add some text.

Make the AutoShape do something special

Right click the AutoShape again and this time click Custom Animation. The Custom Animation window opens allowing you to add effects and sounds as you did before. Notice the small list on the left side of the window titled "Animation Order". You can alter the order of the animation effects by highlighting one of the listed items, and using the arrows that appear just to the right of the list. Make a change. Click the Preview button to see what it will look like.

Record an audio clip

Rather than using one of the standard PowerPoint sounds you can record your own sounds. To add a sound that you record from the menu bar click Insert, move your mouse cursor over Movies and Sounds, and then click Record Sound. A little tape recorder will appear. First decide what you will record. I suggest recording a sound appropriate for one of the objects already on the current slide. Next, change the name from Recorded Sound to something more appropriate. Click the red button to start recording, and the little black square to stop recording. Click the little triangle to review the recording. Click OK if you are satisfied, otherwise click Cancel and repeat the procedure.

Once you have a satisfactory recording, you can assign it to one of your AutoShapes. Right click the AutoShape, then select Custom Animation. You can now set the sound to the one you recorded which should now be on the list of available sounds. Click Preview to check it out.

Sounds can also be added from files. To do this from the menu bar click Insert, then move your mouse cursor over Movies and Sounds, then click Sound from File.

Each time you add a sound it also adds a little sound icon to the slide. You can hide these little icons by adding an AutoShape and setting its fill and line color to be identical to the background. This will make the shape invisible. Then slide the sound icons inside the invisible shape. If they are still visible, they are on top of the AutoShape. In this case right-click the sound icon, then click Order and select Send to Back. This will put the icon behind the AutoShape. You can hide these sound icons behind any object using this method.

Set the slide show for automatic advance.

Slide shows can be set to advance automatically in a timed sequence. To do this from the menu bar, click Slide Show, and then click Slide Transition. A box will open. In the area of the Transition box labeled "Advance" check the Automatically after box and define an interval in seconds. You can also choose a transition effect from the list if you want. Click Apply to All, and then view your show.


Views

PowerPoint allows you to view your work in the editor in various ways. From the menu bar, click View. The default view is the Slide or Normal view. Another view that may be useful is the Slide Sorter, which allows you to rearrange your slides. The Outline view shows the text from each slide.

Monday, February 9, 2009

POWER POINT PRESENTATION.....

As a teacher, we have to know how to make a power point presentation...we can use it as our teaching aid..So, make sure you master in microsoft power point..

First, what is microsoft power point??

Microsoft Power Point is a presentation program developed by Microsoft. It is part of the Microsoft Office system, and runs on Microsoft Windows and the Mac OS computer operating systems. PowerPoint is widely used by business people, educators, students, and trainers and is among the prevalent forms persuisive technology.


Making a GOOD Slide...
  • Summarize points
  • Use large fonts
  • Use graphics for illustration
  • Animate
  • Get the audience's attention

i. Use PowerPoint judiciously for a few key graphics or illustrations.

ii. Avoid text slides. Use text occasionally as a reference point for big ideas; e.g. the three main objectives of a lesson.

iii. Remember other kinds of visulas. Handouts may be a more appropriate alternative.

iv. Don’t be seduced by textbook publishers that offer canned presentations that go with a textbook. You are the teacher. Not the publisher. Not the textbook. You make careful choices of what to use and what to avoid. A lot of what the publishers include is of little value.

v. Avoid using PowerPoint for discussion or coaching sessions.

vi. Whatever media you use in the classroom, work to help students make connections.

  • Making connections is the foundation of memory and ingenuity. The Latin term ingenium refers to the ability to make connections between things that others may not see.
  • Students learn as they make connections. An efficient use of visuals in the classroom can help students make connections between parts and the whole, between cause and effect, between problem and solution, between principle and practice.


Thursday, February 5, 2009

Sambungan buat Blog...!

Rasanya masih ramai yang keliru membuat BLOG menggunakan Blogspot.So, kat sini saya ingin berkongsi dengan rakan-rakan Bagaimana untuk membuat Blog menggunakan Blogspot.


Step 1

Anda perlulah mempunyai email Gmail.

Daftar akaun gmail di laman web www.google.com.


Step 2

Sekarang anda telah pun mempunyai akaun gmail, jadi anda telah boleh mendaftar akaun menggunakan blogger.

Untuk membuka akaun blogger sila layari laman web ini kemudian klik 'Blog'.

Anda akan lihat paparan seperti dibawah:

Step 3

Masukkan gmail anda di ruangan yang disediakan dan klik 'sign in'. Lengkapkan maklumat-maklumat yang dikehendaki seperti di bawah:


Step 4

Seterusnya, namakan blog yang anda mahukan contohnya oceangurlz_bahariah.blogspot.com

Kemudian, check dulu samada nama blog pilihan anda masih available ataupun tidak.

Step 5

Buat pilihan template untuk blog anda. Template yang disediakan adalah template-template yang basic. Anda boleh menukar kepada template yang lebih menarik. Tetapi anda perlu mahir dahulu asas-asas pembinaan blog ini.

Step 6

Sekarang anda telah boleh membuat posting ke dalam blog anda. Di penjuru kanan blog anda, klik 'New Post'.

Step 7

Untuk design blog anda menjadi lebih manarik, klik 'Customize' di penjuru kanan blog.


Hanya 7 langkah mudah untuk anda memiliki blog anda sendiri. Pada satu akaun dengan blogger, anda boleh membuat seberapa banyak blog yang anda mahukan, bukan hanya terhad satu akaun untuk satu blog.
Selamat mencuba..

Monday, February 2, 2009

Ape yang aku belajar??

Alamak!! Arini dh masuk mggu ke3 aku blaja subjek Teknologi dan Inovasi Dalam Pendidikan...lupe nk citer ape yang aku dh blaja dlm subjek nie..Pn.Nor Sakinah dah pesan ceritakan cara2 nak buat blog.so, kt cnie aku berusaha cbe ringkaskan...

First week:

  • mula2 kami join yahoo group untuk student DPLI 2009.so, any news bleh dpt kt sini..
  • kmdin daftr e-learning..atau juga dikenali sebagai spin. Kat sini student bleh dapatkan lecture note, discuss dengan lecturer dan banyak lg..
  • belajar membuat blog..sebelum ni, aku tahu wujudnya blog ni...tapi tak pernah pun nk buat..tapi bila dah ada blog sendiri, bagus sebenarnya..banyak faedah..hehe..
Second week:
  • kami sambung buat blog..
  • try mencantikkan dan tambah apa2 yang patut supaya blog jadi lebih menarik dan tertarik..
  • kat sini aku cuba citer skit macam mana nak wat blog.

What is blog??

Slide 1


continue next post....

My JouRnEy..

Daisypath Anniversary Years PicDaisypath Anniversary Years Ticker